
Where Is the Shotgun in Outbreak’s First Scenario?
If you started in J’s Bar, this guide covers File #1’s Outbreak scenario. On Normal, the early Shotgun is locked in the Owner’s room desk on 2F. Take an Alcohol Bottle from the 3F Liquor room and fit it into the bottle-shaped recess in the wall picture to release the desk. Check your difficulty before following that route.
SOURCES CHECKED OCTOBER 25, 2026 · ORIGINAL-GAME REFERENCEThis is a weapon pickup guide, not the full escape route. For the main objectives, use the File #1 Outbreak walkthrough.
Jump to your difficulty, the five Normal steps, later street pickups, or common questions.
Choose your difficulty first
These are confirmed pickup options, not an exhaustive list of every shotgun in the scenario.
| Difficulty | Location | What you need to do |
|---|---|---|
| Easy | Drawing room wardrobe, J’s Bar 2F | Alyssa must unlock it with her S-Shaped Pick. Without Alyssa, use the later street pickup below. |
| Normal | Owner’s room desk, J’s Bar 2F | Use an Alcohol Bottle in the picture recess, then open the desk. |
| Hard | Police-car trunk at In front of J’s BAR | Reach the street after leaving the building; inspect the far western police car’s trunk. |
| Very Hard | Officer Raymond’s body at Slope along the canal | This is a later pickup. The Owner’s room desk does not contain a Shotgun on this difficulty. |
The Drawing room wardrobe is an Easy-mode shotgun route, not a universal location. On Normal, use the Owner’s room desk route below. If you are on Easy without Alyssa, continue to the later street alternative.
Normal: get the Shotgun from the Owner’s room
- Pick up the Staff Room Key from the bar counter on 1F. Use it on the staff door near the bathrooms and go upstairs to the 2F Staff room.
- Check the table in the Staff room’s recreation area. The Key With Blue Tag is underneath the Newspaper. Take the key.
- Use that key on the upstairs door and climb to the 3F Liquor room. Collect an Alcohol Bottle from the liquor shelves. You do not need to visit the Wine room for this pickup.
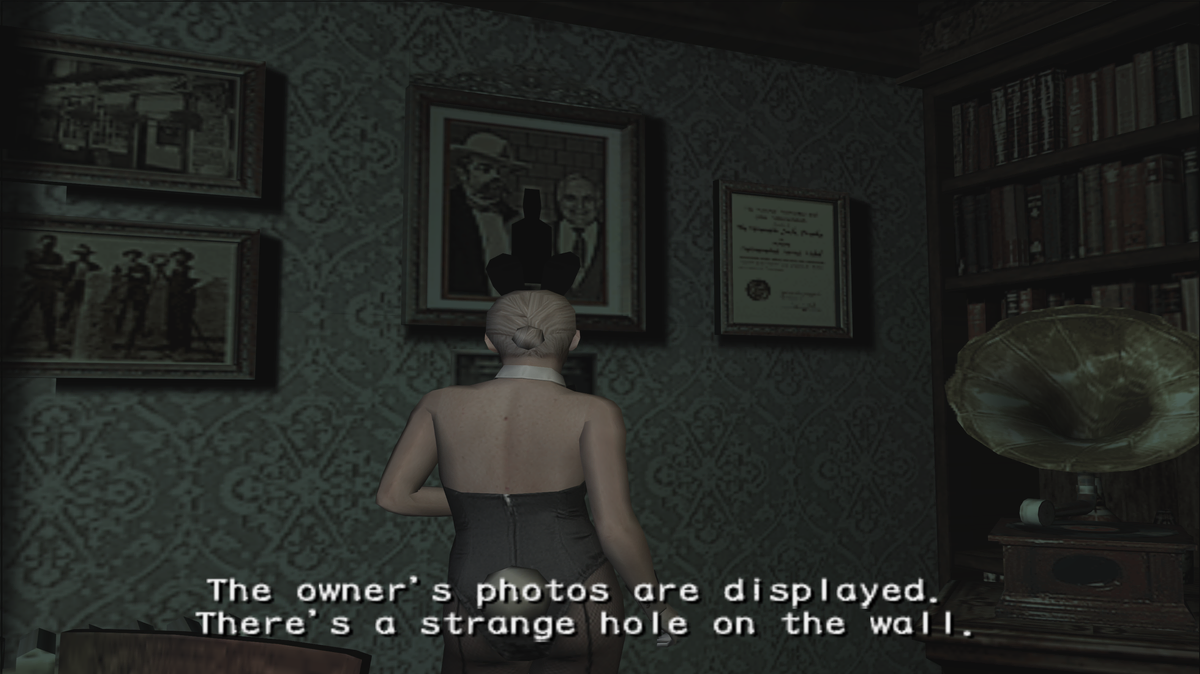
- Return downstairs to the Staff room and enter the connected Owner’s room on 2F. Find the picture on the wall beside the desk.
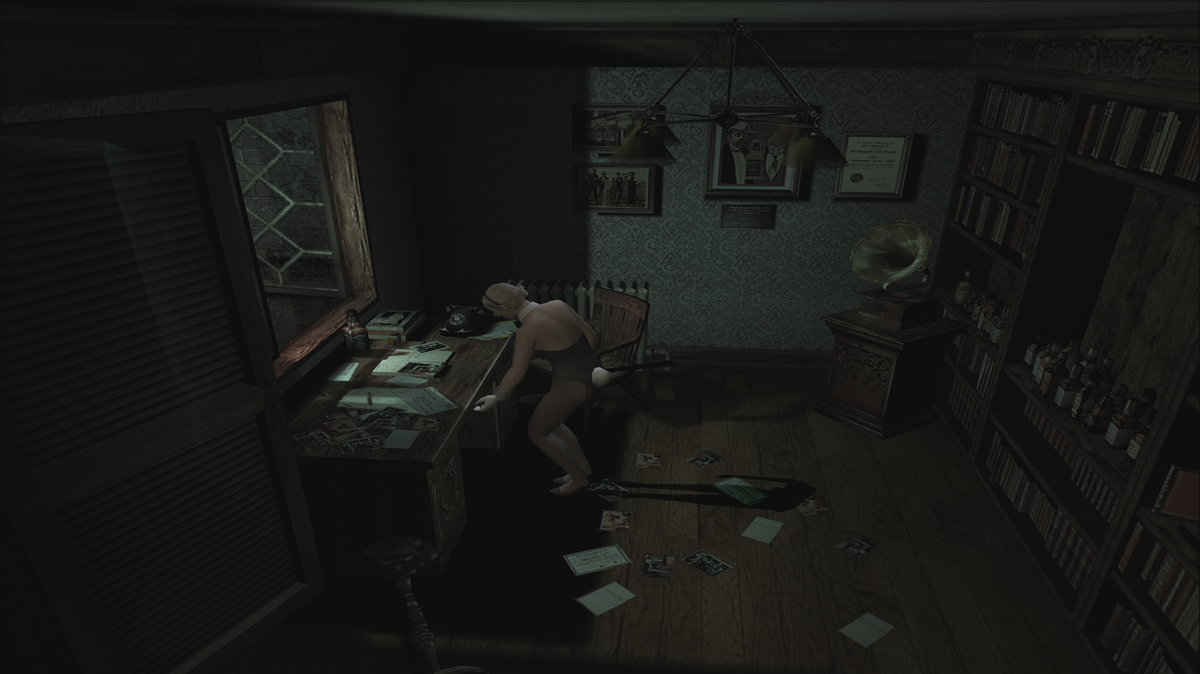
- Use the Alcohol Bottle in the picture’s bottle-shaped recess. Then examine the desk to collect the Shotgun. This Normal-mode pickup does not require Alyssa.
The two keys open different parts of this route. You do not need the Forklift Key to collect this Normal-mode Shotgun. The Wine room and forklift are part of continuing the escape route; they are not prerequisites for this weapon pickup. Check the action and inventory controls if you are having trouble examining the picture or desk.
Already outside J’s Bar?
On Easy, Normal or Hard, inspect the trunk of the far western police car at In front of J’s BAR. This is a later fallback if you missed an indoor Shotgun or cannot use Alyssa’s Easy-mode route.
Another later pickup is at Officer Raymond’s body in Slope along the canal, including on Very Hard. This location becomes relevant after the scenario’s street events.
Check your difficulty before relying on the police-car route: it is listed here for Easy, Normal and Hard, not Very Hard. For the transitions from the roof to the street and canal, continue with the full Normal scenario walkthrough.
Frequently asked questions
Why did the desk give me a Magnum or a key instead?
The reward changes with difficulty: Magnum Revolver on Easy, Shotgun on Normal, and Forklift Key on Hard or Very Hard. Confirm your difficulty before repeating the bottle puzzle.
Is the shotgun in the Staff room?
The Staff room is part of the Normal route and holds the blue-tagged key. The actual Normal shotgun pickup is in the separate Owner’s room desk.
What if my first scenario is File #2’s Wild Things?
That is a different scenario. This page’s J’s Bar route applies to File #1’s Outbreak, not File #2. Use a File #2-specific weapon-location guide. Check which File you are playing before following a room route.
Sources and verification limits
Research checked against published original-game walkthroughs and specialist item maps on October 25, 2026. The browser port’s actual pickup sequence has not been playtested here. These references describe original-game pickups. Their agreement is not evidence of a successful browser session, and this page does not cover every character variation or multiplayer item state. See the site’s source notes for the wider verification boundaries.
- Evil Resource — Owner’s room: difficulty-specific desk rewards
- Evil Resource — Drawing room: wardrobe contents and Alyssa’s lockpick
- Evil Resource — File #1 Shotgun: locations by difficulty
- Evil Resource — Staff Room Key
- Evil Resource — Key With Blue Tag
- Evil Resource — Alcohol Bottle: locations and picture use
- Doug Radcliffe / GameSpot — Resident Evil Outbreak walkthrough
- SairentoZ7 — Outbreak illustrated guide
- Evil Resource — In front of J’s BAR: police-car pickup
- Evil Resource — File #2 Shotgun E: separate scenario reference
Image notes and credits
Owner’s room wall portrait
Look for this bottle-shaped opening beside the gramophone in the Owner’s room. The screenshot identifies the puzzle, rather than confirming a difficulty or its reward. Source: SairentoZ7’s original-game guide. Game image © CAPCOM.
Owner’s room desk drawer
After using the bottle in the portrait, check the desk beside the window. The Shotgun is the Normal-mode reward; the screenshot shows the drawer’s position, not the weapon pickup. Source: SairentoZ7’s original-game guide. Game image © CAPCOM.